
How to setup WireGuard VPN and securely access your resources
This guide will show how to set up WireGuard VPN to stay private, defeat censorship, and access your remote resources. As a follow up to my last article I’ll show how to connect to your Bitcoin Electrum Personal Server privately and securely.
You’ve probably been bombarded by VPN marketing material saying you must get a VPN, but should you actually? Why would one need a VPN?
First let’s get through joke that is the typical VPN marketing material to dispell some myths/unverifiable statements:

Sponsored by **** VPN
- No logs (not verifiable, there have been incidents of companies logging, but stating otherwise, would you really trust a company to not buckle under government/bad actor pressure?)
- Military grade encryption (this usually just means AES-256)
- Protects you from hackers (only really relevant on http websites, which there are a minority of)
Reasons to have a VPN #
- Mask your IP address and location
- Prevent packet sniffing on public networks (only applies to non
httpswebsites, which VPN companies conveniently avoid mentioning 😉) - Use it as an ad-blocker (Will write about this in another post)
- Access region locked content (you might have problems with Netflix though)
- Avoid government censorship
- Access remote resources (e.g. your Electrum Personal Server - which I covered in the last post: how to set up your own Bitcoin node and Electrum wallet)
- Torrenting (so your ISP doesn’t come after you, if you are using a VPS, first check their use policies), google
DMCA ignored countries
Why you should run your own #
Pros:
- You are a smaller target than a large VPN company. e.g. NordVPN got breached
- Won't get acquired by malware companies (PIA VPN)
- Cheap (you can get a VPS for as low as 3eu/mo), you can also use a Raspberry PI
- Actually no logs (you are in control)
- You are in control over the software (using WireGuard over OpenVPN, making sure the binaries are not tampered with)
- You can manage access to remote resources that you need with complete freedom (e.g. no random ports assigned to you that are forwarded)
Cons:
- Can’t easily distribute your VPN through multiple countries
- Your VPS provider could still spy on you (but, is a smaller target than a large VPN company)
If you still can’t be bothered to run your own, at least do your research on good VPN companies. My recommendation is Mullvad VPN. Obviously pay with an anonymous payment method.
Wireguard #
My choice for VPN software is Wireguard:
- Easy to use (as opposed to OpenVPN or IPSec)
- Uses up-to-date cyphers
- Minimal attack surface (4,000 compared to the 600,000 total lines for OpenVPN + OpenSSL)
- It made it into the Linux mainline kernel recently (Better performance)
- Performance (intrinsically, besides the last point improving it further)
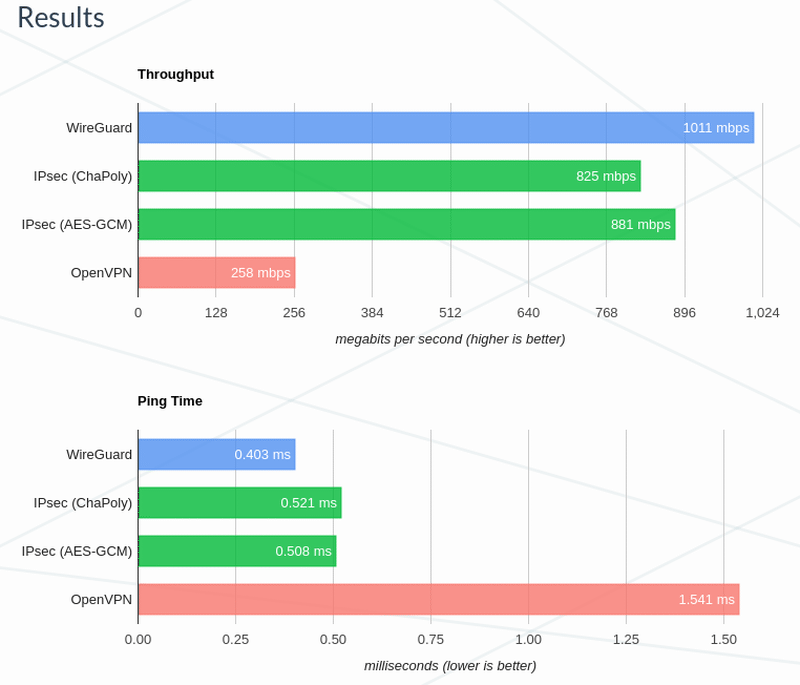
WireGuard benchmark
How to set up WireGuard #
I will assume you already have a machine set up to host your VPN and have WireGuard installed already (make use of the DKMS kernel module). I use a Hetzner VPS, they have really cheap cloud instances with very good networking.
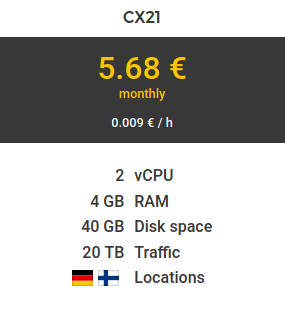
The server I use to run the VPN (I also run a lot more things, like my Bitcoin node, which I covered in the last post)
The Server #
First you might want to set up firewall rules (you will also want to allow other ports for services, such as ssh, don’t use the default port 22 as you will get port scanned). I recommend ufw, as it’s dead simple to use:
# 51820 is the default port that WireGuard uses
sudo ufw allow 51820/udp
sudo ufw enable
Generate public & private keys:
umask 077
wg genkey | tee privatekey | wg pubkey > publickey
Pro tip: use a vanity key address generator to have pretty addresses that are easy to recognize.
Configure your network device
ip link add wg0 type wireguard
# I use 10.0.0.1 as it's easy to remember, this is arbitrary
ip addr add 10.0.0.1/24 dev wg0
Link the WireGuard private key to the device
# I keep my keys in ~/.wg/
wg set wg0 private-key /your/key/location
Up!
ip link set wg0 up
The Client #
The client configuration looks very similar, the only exception being the second step (repeat the other steps):
ip link add wg0 type wireguard
# Notice here we're using 10.0.0.2!
ip addr add 10.0.0.2/24 dev wg0
If you want to add more clients, keep iterating the last bit of the IP.
Connection! #
To easily grab your public keys and port, use the sudo wg command, here’s the output:
interface: wg0
  public key: yourServerPublicKey=
  private key: (hidden)
  listening port: 51820
Now we need to configure our server config, insert the keys and IPs that you configured/generated previously:
The Server
[Interface]
Address = 10.0.0.1/24
# If you want ipv6
Address = fd86:ea04:1115::1/64
SaveConfig = true
# Remove everything with `ip6tables` if you don't need ipv6
PostUp = iptables -A FORWARD -i wg0 -j ACCEPT; iptables -t nat -A POSTROUTING -o eth0 -j MASQUERADE; ip6tables -A FORWARD -i wg0 -j ACCEPT; ip6tables -t nat -A POSTROUTING -o eth0 -j MASQUERADE
PostDown = iptables -D FORWARD -i wg0 -j ACCEPT; iptables -t nat -D POSTROUTING -o eth0 -j MASQUERADE; ip6tables -D FORWARD -i wg0 -j ACCEPT; ip6tables -t nat -D POSTROUTING -o eth0 -j MASQUERADE
ListenPort = 51820
# Do not share this with anyone
PrivateKey = THESERVERPRIVATEKEY=

[Peer]
PublicKey = YourClientPublicKey=
AllowedIPs = 10.0.0.2/32

# You can keep adding clients below
The Client(s)
[Interface]
# Do not share this with anyone
PrivateKey = YOURCLIENTPRIVATEKEY=
Address = 10.0.0.2/24

[Peer]
PublicKey = YourServerPublicKey=
# Allow everything
AllowedIPs = 0.0.0.0/0, ::/0
Set the nodes up (On all clients and servers)
sudo wg-quick up wg0
# replace wg0 with whatever you called your interface
sudo systemctl enable --now wg-quick@wg0
Connect!
From your client:
# replace the IP that you used for the server
ping 10.0.0.1
From your server:
# replace the IP that you used for the client(s)
ping 10.0.0.2
Check if the data was transmitted:
sudo wg

# Your output should look like this (with an appropriate data amount)
latest handshake: 40 seconds ago
transfer: 208.08 MiB received, 83.16 MiB sent
And you’re connected!
How to use on Android #
Download the WireGuard Android app.
Now you want to configure the settings with the appropriate entries for you (the first private/public key pair is the one you generated for your Android). You can ignore the DNS entry, I use dnsmasq to block ads with WireGuard, which I will cover in a coming post.
The peer public key is your server’s WireGuard public key.
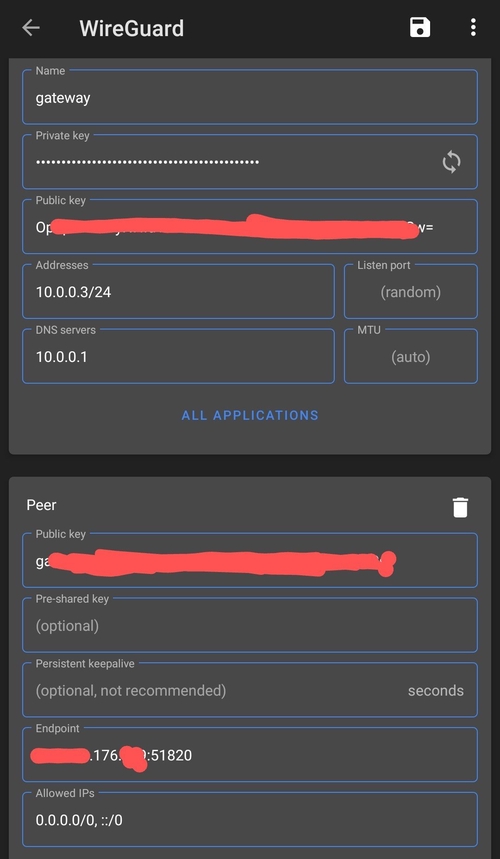
WireGuard Android configuration
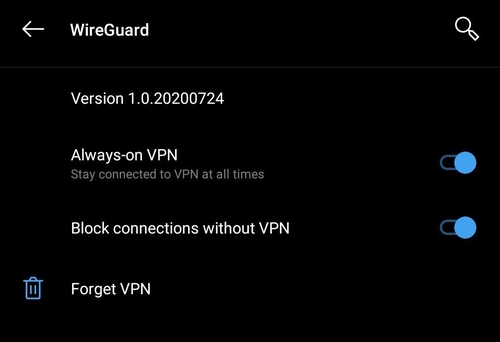
Make sure that your VPN is always on and doesn’t accept any connections not coming through WireGuard.
Connecting to Electrum Personal Server #
As a simple example, I’m going to show how to connect your freshly set up WireGuard VPN to connect to your Electrum Personal Server. For a how-to, check out my last post on setting up a Bitcoin node with an Electrum wallet and server.
On the server #
Make sure you add the client IPs in your EPS IP whitelist configuration (10.0.0.3 is my Android device with the Electrum app) and the host.
# Your WireGuard server IP
host = 10.0.0.1
# Add however many clients you want, separated by whitespaces
ip_whitelist = 10.0.0.2 10.0.0.3
On the client(s) #
You want to make sure you are not connecting more than 1 device, as at the moment EPS can only handle 1 connection at a time. You also want to make sure you are connecting to the WireGuard server IP with its corresponding port. If you have ever connected to a 3rd party Electrum server, you should create a new wallet, as it’s not private anymore.
Before you start a wallet on any client, you might want to turn off all networking, just in case it tries to connect to a 3rd party server.
Desktop #
I highly recommend getting a hardware wallet, I personally recommend the Trezor model T, which is stellar and fully open source. Use this link if you’d like to help my blog out.
Run electrum with these options to stay private
Normally, electrum will connect to a third-party electrum server, which will leak your IP address and thus, compromise your privacy. So we only let it connect to one server and for now to localhost, as we don’t have an EPS running yet.
Edit your config in
~/.electrum/config. This is a minimal config for maximized privacy:
{
  "auto_connect": false,
  "oneserver": true,
  "confirmed_only": true,
  "server": "10.0.0.1:50002:s",
  "skipmerklecheck": true,  <-- this is important if your node is pruned
  "use_rbf": false
}
Tools->Server Make sure your port is in there.
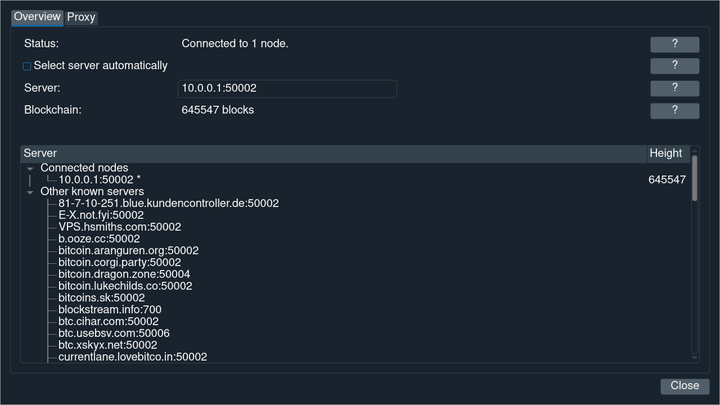
My wallet connected to my WireGuard VPN.
Also make sure, in the main Electrum window, bottom right, that the circle is green, not red.
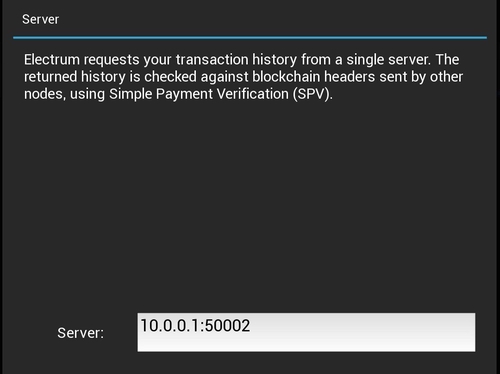
Android #
Network->Server Make sure your corresponding IP and port is in there.
You’re done! Enjoy your increased privacy, sovereignity and independence.
Credits #
The featured picture is by Gioia Best, take a look at her Instagram.